DIY Digital Room Correction with Linux
A Very Simplistic Guide to a Room Correction Setup I Once Had
This document outlines a very naïve, minimalist approach to ideas around digital signal processing and room correction, a little about what is wrong with such a simplistic conception, and some various language that could help you start a journey into digital signal processing.
Backstory
Around 2009 or so I had a basic home theater personal computer setup. This involved a Linux PC, running XBox Media Center (XBMC) or somthing simiilar, and then some very basic home theater equipment, namely, a surround sound receiver and an HDTV. The TV was a Christmas gift from my father that cost around $300, an 1080p LCD branded as a Sanyo. The receiver was an RCA that was on sale from Meijer for $100. None of this is necessarily “high fidelity” but probably better in some ways than something older at the same price point.
The XBMC (now Kodi) played DVDs, rips of DVDs, YouTube, etc, and ran on top of Linux. The PC was connected to the TV via High Definition Multimedia Interface (HDMI) (or possibly just Video Graphics Array or VGA, I can’t quite remember, and possibly both and I could switch between them) and to the stereo system via a Toshiba Link (TOSLINK) optical fiber cable. Additional stuff included an IguanaIR USB infrared transceiver dongle with the receiver on the dongle pointing forward and the transmitters on wires taped to and blocking the infrared inputs to the stereo and TV. LIRC was used to unify control and provide automation of system and provide what now is general Consumer Electronics Control (CEC) type stuff. When the power it went out, it was like starting up Jurassic Park trying to get everything in sync and talking to each other again.
The Idea
So I had a work aquaintance who had perhaps the opposite system in many ways… installed by professionals with theater seating, server rack, a touch screen tablet as a remote, and a very bright projector. He mentioned in passing that the system had room correction which I had heard of, so I read a bunch about it.
It seemed simple enough:
- Play an audible sweep of tones from 20hz to 20khz through the system and record what comes out.
- Analyze the real audio amplitude levels of the tone at various points along the recorded sweep.
- Use equalization to reduce the louder tones to match the levels of the lower amplitude tones (ideally do all adjustments as reduction of audio levels in order to not amplify noise.)
The Test
I spent a lot of time reading about digital signal processing and room correction. I kept thinking there had to be a way to do this stuff on a personal computer, and lo and behold, I eventually found a really great piece of software called the Room EQ Wizard available at http://roomeqwizard.com and it even worked on Linux. It isn’t open source it seems, but it is free for personal use.
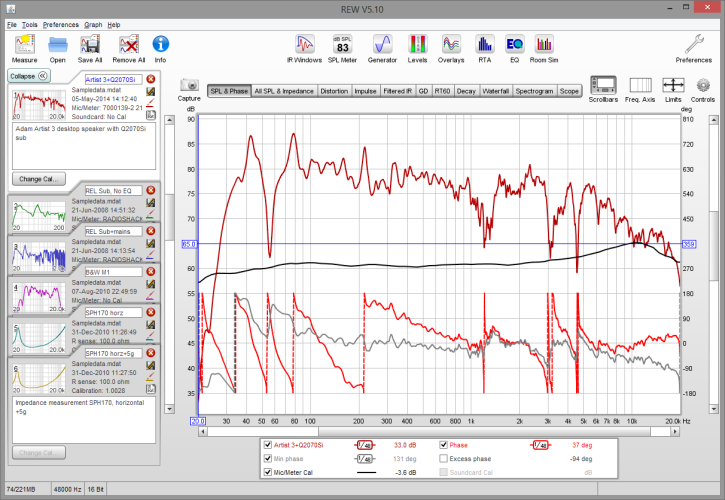
This software seemed to handle most everything I needed, although, honestly, I didn’t understand it all. But it certainly would perform a bunch of tone sweeps and record the output. For a microphone I think I had something sort of professional like… the Marshall MXL 990 and a preamp to go with it. This may be the reason why any of this was even remotely successful.
The Test Results
So I remember the graph being very very erratic! I was very surprised just how awful the frequency response seemed in the system, and the more I played with the tone sweeps, the more I heard the sweeps get quieter and louder at the very points the graph was saying it was happening.
The software seemed to have a lot of features as I mentioned before that I didn’t understand, but my understanding of the analysis part seemed fairly straightforward at this point. The software also allowed for making equalizer profiles or some such to save and use in other systems, but I didn’t have any of that. I just wrote down on paper the frequencies that I wanted to lower, took a screenshot of some of the graphs, and went nosing around about how to get the computer to correct its own audio output.
The Implementation
So as it turns out, while a lot of criticisms get lobbed at Linux and the myriad audio subsytems, it turns out it can be quite powerful once you dig into it. I had previously done some audio recording (hence the nice mic) and messed around with the real time Linux kernels and such to provide low latency, so I was a little familiar with several components. I was not using this system for audio recording, however.
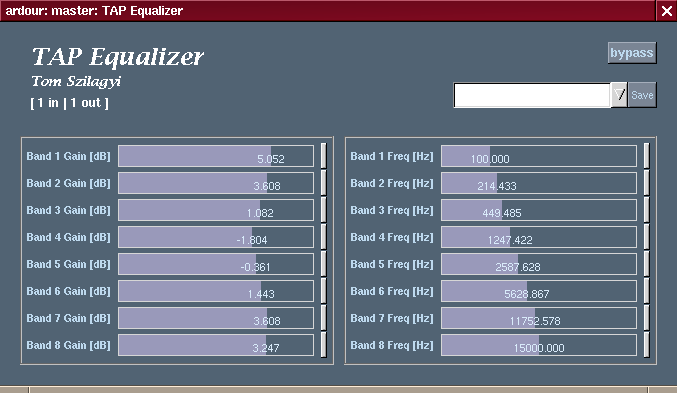
Put simply, the Advanced Linux Sound Architecture (ALSA) supports the Linux Audio Developers Simple Plugin Application Programming Interface (LADSPA). This is the same software used by a lot of music recording software, and several hundred developers have created a rich landscape of audio software and plugins. But it was rather surprising to see that the sound card system itself supported these plugins. You can create a virtual sound card which has whatever plugins you want attached to it, and any audio sent to that virtual sound card will have the plugin’s digital signal processing applied first before being sent to the hardware. There may be a miniscule delay, but I managed to get a parametric equalizer plugin with the above found frequencies following a guide similar to the one at https://alsa.opensrc.org/Ladspa_(plugin) … Using an .asoundrc configuration file, and then making that the default audio output for XBMC, it all just worked. The .asoundrc file contained a list of the frequencies and the level adjustments in plain text as configuration parameters to the plugin. These plain text values correspond the GUI inputs as shown below.
The Effect
For such an uneducated attempt the results were astounding. I think I could tell after a few months it wasn’t exactly quite right in some subtle ways, but pretty much immediately after I enabled it I was able to lower the volume and still hear most every detail with clarity. This was something I struggled to do before and often had to have the volume at a bare minimum of 50% in order to hear speech correctly. Now I could get away with 15%.
The plugin did seemingly tax the CPU a little bit. I would often recompile software from source on that machine for other projects and if I was also watching a video, that would defintely (in addition to the file system businees from both the media being played as well as files being read and written) cause stuttering of the playback. But if I kept my nosing around from my laptop at a minimum while playing videos I could enjoy the better audio using some very basic equipment.
A Brief List of Issues
There are actually, as I’ve since come to find out, and also sort of knew at the time, quite a few problems with this setup:
- Room correction is one aspect of what all is going on, but we’re also trying to sort of correct for the sub-par equipment. And there are things like echo and reflection which are little affected by this technique. There is a whole set of “room treatments” which can be done to make a room less bright.
- The profile of the microphone, while a nice microphone, was not entirely known, at least in a controlled fashion, and added a curve of its own to the recorded audio, which made the overall effort inaccurate. Using any microphone that isn’t some kind of callibrated microphone with a known profile will introduce its own errors into the analysis. That being said I’d be curious about random small condensor mic performance.
- There is probably a lot of noise overall that may have complicated the effort. Noise in the RCA receiver, noise in the sound card, noise in the mic preamp, and probably other errors like I imagine the frequency response of the digital to analog output or the analog to digital input of the sound card may not be flat either.
- This was recorded from one position in the center of the room. A recent room correcting receiver I purchased had me set the callibrated microphone in several places in the room. I’m sure this involves a bunch of math I know nothing about, and the Room EQ Wizard software seems aware of multiple microphones and multiple testing locations.
- After reading the Wikipedia page below on the topic, I completely ignored also the idea of different responses at different volumes… and the responses of each channel as well. This is something a basic system with room correction will do.
- I suspect there is some non linear aspects of the crossovers in the speakers, as well as the transition between the subwoofer and the regular speakers which the receiver did, and to think of things like 7.2 audio and what happens to what audio frequencies when and on which wires seems to become also more complicated to think about.
- I believe I had the same length of audio cable to each speaker which may have helped some as well. That seems like a reasonable thing to do, but there is a lot of pseudoscience in the audio world that will get you to buy platinum tipped styluses for depressing buttons on your remote.
- When I think of the term “response” in this context I think of other things like simulation of microphones, amplifiers, and rooms, which is all in the neighborhood of room correction. If it can be measured, then it can probably be simulated, or synthesized.
- In general, I don’t know enough even about what I don’t know in order to say if any of the above is worth worrying about, or if there are even whole swaths of other issues I’m not thinking about.
Finally
You get what you pay for. I paid quite a bit in time, and I learned a lot, and I didn’t get an expert’s implementation, but with some amazing software written by others I managed to get a 80% solution that served me quite well. I’m not sure I’d recommend going this route however these days unless you just want to mess around. My current room correcting receiver produces superior results and while it is a refurbished unit didn’t cost much more than the system mentioned here… we are living the future and digital signal processing with dedicated chips is very inexpensive. If this sort of thing is interesting to you, I’d encourage you to keep googling, send me a pull request of additional ideas and resources, or get some books or take classes in signal processing. Get your amateur radio license too while you’re at it, there’s a whole world to digital signal processing for the amateur radio enthusiast these days with software defined radio and digital mode transmissions.
What do you think? Am I missing something very important that a beginner should know? Could, or will, this technique become even more ubiquitous? I have seen standalone DSP boards which can perform these operations and are very inexpensive. Why are these techniques not built into Televisions themselves yet, or our PCs and laptops? Perhaps it is overkill. Feel free to send me a pull request on this document if have anything to add.
Resources
- Room EQ Wizard https://www.roomeqwizard.com/
- Python Open Room Correction https://www.minidsp.com/applications/advanced-tools/python-open-room-correction
- ALSA and LADSPA Plugins https://alsa.opensrc.org/Ladspa_(plugin)
- More advanced ALSA and LADSPA example https://alsa.opensrc.org/Low-pass_filter_for_subwoofer_channel_(HOWTO)
- Digital Room Correction https://en.wikipedia.org/wiki/Digital_room_correction
- TAP-Plugins Equalizer http://tap-plugins.sourceforge.net/ladspa/eq.html
- Kodi https://kodi.tv/